
Guest Article by Jenna Dubrofsky (A.K.A. Miss Creativity)
Who knew that success could be found in a colored pencil?
Three years ago I was online searching for fun, new, and HELPFUL products to use to teach editing in my classroom. I was a third year teacher at the time, but in my first year of teaching third grade! Now let me tell you something about myself, I tend to be a perfectionist in my classroom, (it came out of nowhere!) and I like to create almost everything I use, but I hit a roadblock when it came to editing. I needed to make editing fun! I was a newbie on the Six Traits of Writing Revising and Editing Pencil Kit. 3,2,1, SOLD!
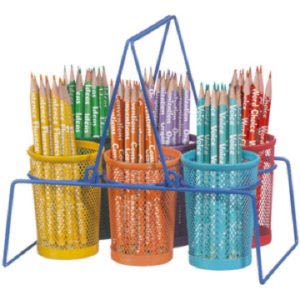
Who knew that the delivery of a large brown box would be so enjoyable? I tore the box open, sharpened each pencil, and organized them into little baggies. Since time is limited, I created and enforced a “grab-n-go,” system. All my kids had to do was grab a baggie and go back to their seats.
Revising and Editing Writing Success in Style
 How I organize them:
- I purchased a large set of colored pencils for my initial set, sharpened one of each color and created ready-made editing baggies (1 of each colored pencil per baggie)
- I placed the completed baggies in the original pencil caddy that came with the set.
- When the students are editing their own writing piece or a peers, they grab a pre-made baggie that includes one of each color: red, blue, yellow, orange, green, and purple.
- They are responsible for sharpening the pencils before returning them to the baggie, then into the caddy. If a pencil becomes to low or it breaks, I give the students a replacement color from my “lost pencils,” bin.
How I display them:
- I created large, labeled replicas on cardstock, and had them laminated
- I display my large replicas along the top of my Smart Board (a central location in my classroom)
- I post the “Rules,” and the “How to use,” directions in the “Writing Center,” and print a black and white copy for each student to keep in their writing folder.
- I have the students create a “key” in the back of their writing notebooks. A colored circle and what that color represents.
(EX: “red dot” = capitalization pencil)
My pencil rules:
- Check to make sure your baggie is complete when you grab one before editing!
- If it’s not complete please see me FIRST to give you a replacement colored pencil OR find a replacement in our “Lost Pencils,” bin.
- If your baggie is torn that could cause the pencils to fall out, please take a new baggie from our “Baggie Bin.”
- When you’re done using these pencils, please sharpen them BEFORE returning them to the baggie. If a replacement is needed follow rule #2 or #3.
- Return your baggie back to it’s nice home in “Editing Pencils” caddy.
How I use them:
- If you find a spelling mistake CIRCLE the misspelled word in BLUE.
- If you notice that a punctuation mark is missing, add the punctuation mark and put a small circle around it in ORANGE. If there is a punctuation mark in the writing that shouldn’t be there, put a circle around it with a small line through it in ORANGE.
- If you notice that something needs to be capitalized, draw three small lines under the letter that needs capitalization in RED.
- If you’re reading a sentence and it doesn’t make sense or doesn’t sound fluent, UNDERLINE the whole sentence in YELLOW.
- If the wrong choice of words was used, (ex: their, there, they’re) circle the word in GREEN.
- Use the PURPLE pencil for whatever the current writing or grammar skill is. Follow your teacher’s directions for this pencil.
My students LOVE editing time, they BEG me to let them edit and to peer edit. Editing used to be painful, stressful, and boring, but not anymore!
The coolest part of all this is that 3 years ago two of my administrators walked into my room ago while we were using these pencils. They were amazed at how engaged the class was in the editing process. They were so pleased that they bought a set for EVERY teacher in my school. I felt honored that something I was using inspired others, just the same as how Really Good Stuff inspired me. So thank you Really Good Stuff for helping me to be the best teacher I can be!
About me!
 I’m finishing my 5th year of teaching in a New York City public school. My first two years I taught 2nd grade and for the last three years I’ve been teaching 3rd grade gifted and talented. I grew up always knowing that I wanted to teach, but not really understanding why. Teaching has taught me to be creative beyond my knowledge, and to push myself past my known limits. It’s taught me to never to expect perfection, but to expect to see progress by expressing hard work and dedication. I’ve recently created my own blog so that it can be a place where we, as educators, can share our ideas and our stories.
On my free time I enjoy: learning how to cook new recipes, trying new things (tree-top ropes course), Warrior Dash charity races, Color run charity races, spending time with my family and friends, going to the beach, and shopping!
Visit me at on my blog, www.misscreativity.com or on my Facebook page.
Great idea for organizing these pencils! I’ll be sure to follow you on facebook/blog & the Teachers Pay Teachers website, you seem to have some fun and cute ideas. =)
~Danielle, 4th Grade Teacher – Atlanta, GA
This is brilliant! Thanks~
Just read the article on editing and realized that it is a great tool that I can use with my students. I teach special education students grade 8 and they can learn not only this skill but and apply the different colored pencil technique to other tedious tasks they often avoid when writing. Thanks for the organization technique with the baggies. Great idea.Special education teachers should check this out!!!!!