Summertime and the living’s easy — oh, who am I kidding? We’re teachers. Despite what many people may think, we don’t really have the summers off. We’re busy writing curriculum, attending professional development courses or just generally preparing for the new year almost as soon as we close the door on the previous academic year. Though it’s nice to have a little time outside the classroom every summer, it’s not as though us teachers are just kicking back at the beach all day. We’re still working to ensure that our students get the best classroom experience possible.
This summer, I decided I was going to revamp my classroom, determined to get more organized and mix things up. Of course, that led me to the motherland of all fantastic teacher ideas –Pinterest, where I confess I have no less than 27 boards devoted to various teaching ideas, classroom decorations and student projects. Each board contains hundreds (over 600 to be precise) of fabulous ideas that apparently other real, live teachers are actually doing, making and implementing. Each one of these boards is carefully organized by subject matter and given thoughtful and creative names.

At the time I pin them, I have the best intentions. Truly, I do. Each year, I promise myself I will keep track of guided reading levels in a handy-dandy, clever Velcro file folder or that I will, certainly, find 150 fantastic uses for electrical tape that my classroom “cannot do without!” So, it’s with a tremendous amount of shame I confess that of all those carefully arranged pins, I’ve probably actually used about five of them. Because, to be honest, those super organized, color-coordinated teachers (you know the ones) with adorable classrooms with curtained windows, canopies in their classroom libraries and darling area rugs, well — I love their ideas, but I secretly hate them. Or maybe envy is a better word.
The Making of a Milk Crate Seat
So, one night a few weeks ago, I was fruitlessly pinning away when I kept coming across these darling little seats made out of milk crates. I’m sure you’ve seen them all. They’re to-die-for cute. But, then I read the description of how to make them and stopped dead in my tracks. They all seemed so complicated and time-consuming, with complicated steps that require cutting wood and sewing covers. Unfortunately, despite my mother’s career as a seamstress, I did not inherit that particular skill set. I am a teacher who cannot sew — not even a hem.
Undaunted, I was determined to made these seats and add them to my new and improved classroom library. While I may not be able to sew a stitch, I can handle a glue gun like nobody’s business. So, I hauled myself down to the fabric store, purchased some heavy-duty fabric, some foam and some glue sticks — all on sale. Who needs a sewing machine, right?
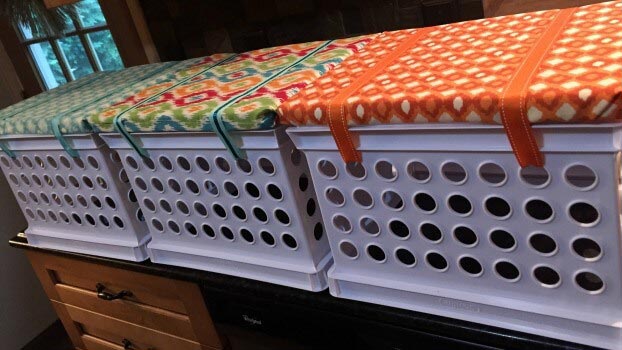
And you know what? Quick as a flash, I made six milk crate seat cushions without ever touching needle to fabric. Best of all, I only burned myself with hot glue twice, which is pretty good when you consider I used approximately 25 super long sticks. I even tested the stability of the crates by having my 12-year-old sit on them to make sure they’d be sturdy enough for my third-graders. And, since she didn’t go crashing to the floor, I consider these a success!
So, for all of you teachers who would like to take on this project, but who also lack the sewing gene, here’s how I made them. Trust me, if I can do it, you can too. They were inexpensive and took me only minutes to make. If you can wrap a birthday gift, you can make these classroom chairs!
How to Make a No-Sew Milk Crate Seat
Here’s what you’ll need:
- 1” or 2” foam (you can get this by the roll or buy it in individual squares at any fabric store or craft store)
- 1 glue gun
- Glue sticks
- Fabric (I used a patterned canvas type material)
- Ribbon
- Scissors
- Plastic milk crates

Here’s how you make them:
- Flip your milk crate upside down and measure the top.
- Cut your foam to fit the top of the crate.
- Cut a piece of fabric to size, flip it over and place the foam on top.
- Apply hot glue to the fabric and pull taut on two sides. Allow some time for the glue to dry and harden.
- Fold in the other two sides like you’re wrapping a present and secure with glue. Again, let the glue harden before moving on to the next step.
- Place the finished cushion on the top of the crate.
- Wrap coordinating ribbon around the cushion and tie underneath the crate to secure the cushion in place. (And I added a little glue to the ribbon to keep it extra secure. You know, because 8-year-olds.) Voila! Instant seating!
Tip: You can even zip tie two or three of the finished milk crate seats together to make small benches.
So, if you have Pinterest-envy on a rainy summer day and you’re thinking about updating your classroom seating quickly and affordably, this is the craft for you. You don’t have to learn to sew overnight, I promise. Just give this milk crate furniture tutorial a try and fully embrace the wonders of the hot glue gun like I have! It’s easy, it’s fast and it’s inexpensive, making it a perfect fit for busy teachers. While this was a great summer project for me, you could easily do it on a weeknight or weekend during the school year. I’d love to hear how yours came out, so if you try it, please share your experience!
By Wendy Cushing
About the Author: Wendy Cushing has been teaching for 28 years in grades Pre-K-3. She currently teaches 3rd grade in Monroe, Connecticut. In addition to teaching, Wendy enjoys pinning teaching ideas she will never use, party planning, freelance writing, and hanging out with her over 300 lbs. worth of dogs. She is mom to two wonderful daughters, one living in NYC, and the other about to enter 7th grade.
This piece was originally published in 2018.
This is awesome! I’ve been wanting to make these forever and I now I can. Thank you.
I, too, consider myself a “glue-gun Queen!” This is a much easier way to create these seats, and thank you for reminding me that I can do it!
Thanks for the idea. I think I could handle making these. They are so cute and could be used for many different things. You’re a genius!! (I also love to pin things that I never get around to using!)
Also, if you want to reinforce them lowes and home depot will cut particle board to put under the foam. Just glue the fabric to foam to board. And attach just as this shows.
Or they can not be tied on with ribbon, flip the crate over for the seat to go on top of the other side, it is removable and viola reading center buckets. All their stuff is inside their chair. If you do that you really need the reinforcement though.
This is so weird. I was just thinking about making these today for my classroom. Thank you for giving such easy, clear directions.
Love these!! Tried spray adhesive for the fabric to the foam, and also for the foam to the crate. Not sure how well it will hold, but ran out of ribbon! Lol also did one ribbon in the middle
Vs two…thanks for the idea!